I knew as I was creating the Sites page last August that I would forget and/or become too lazy to update the Last Active section. Only 23 sites have been updated within the past year at the time of posting, so, assuming I only checked these ones, it wouldn’t be a terribly difficult task. But, to save myself the slight effort and act under the guise of “learning something new”, I pressed on with automating the process. Also, if I were to get it working, I told myself, someone in the future could use the same script for a project of their own.
This project only covers the sites that are proxied in order to be served under the .p101 domain. Sites that are mirrored are no longer up so they do not need to be crawled to check for activity. I am checking (almost) every proxied site because this system will also let me know if a proxied site goes down at all. Every step below uses the native URL of each site, not its proxied .p101 domain.
Finding Site Meta-Info
I say “Meta-Info” because we need to find data about the site itself. In more technical terminology, this is called the Application Programming Interface (API). Each website platform has its own API methods and locations but the general goal is to programmatically find information about each site. Most platforms make their API publicly available in the hope that particularly enterprising users build their own tools to enhance the ecosystem. I am essentially describing how to build a bot, but this is not an inherently bad thing. So long as nothing malicious is being done and I am not overloading the traffic capacity of their servers, they could not care less.
Blogger
Blogger has the largest share of Pirate fansites so I started there first. After a bit of searching I found that the data for each is stored at:
https://www.googleapis.com/blogger/v3/blogs/[blog-id]?key=[API-key]
https://www.googleapis.com/blogger/v3/blogs/[blog-id]/posts?key=[API-key]
Blogger is owned by Google so it kind of makes sense that the API is served from the googleapis.com domain. But I had no idea that each Blogger page had its own id. They make it hard to find unless you are specifically looking for it; it is not referenced on the rendered page at all. I had to view the page source HTML and search for “blogid” until I found a long string of numbers. I think it is possible to view the site data using the blog name itself but I couldn’t get it to work properly.
Once I filled the blog id into the API URL I got to a JSON-formatted page denying access. It said that I needed to send an API key with each request. Presumably this is to track who is using the API in the event that someone does something naughty. A bit more searching and it turns out that anyone can get an API key using Google’s Developer platform. Once I plugged this last bit of info in the URL it worked properly and returned the data I was looking for.
 Searching the raw HTML source of Aaron's Adventures Blogger page. BlogID first appears on line 664 as the large number after the highlighted text.


I actually created a new table in the MySQL database hosting the site info to hold all of the blog IDs and their corresponding blog. This isn’t necessary and could probably just be a CSV somewhere, but this option is more scalable.
Tumblr
Tumblr is the third largest platform of Pirate fansites, but I am mentioning it second because it also has a single, regular method of extracting blog data. This is one of the benefits of using a centralized service for hosting your content. Even though you forfeit some of the ownership of your content and how it is hosted, the service provider is able to maintain a system consistent across millions of different blogs. This data can be accessed at:
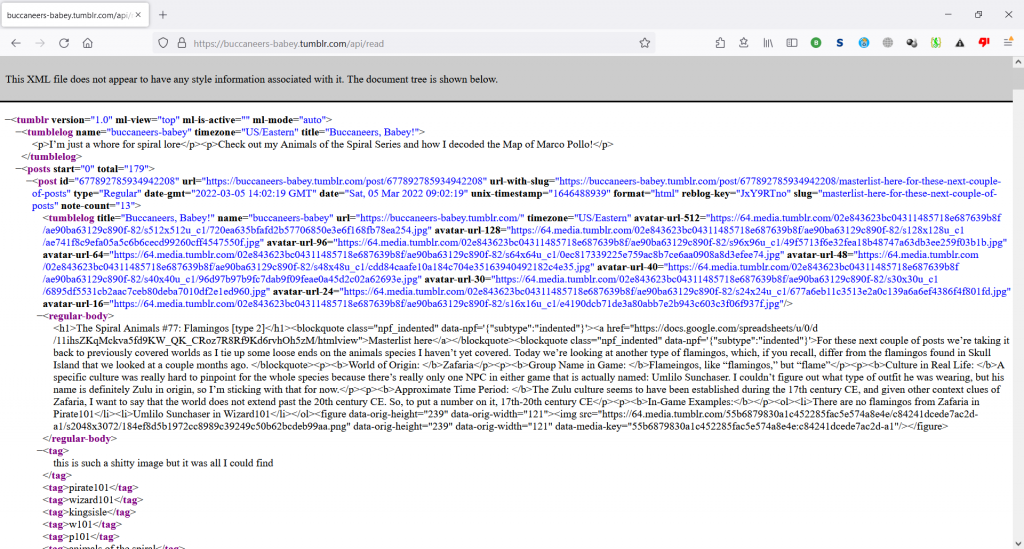
https://[blog].tumblr.com/api/read
This API page is an XML file, a sort of cousin to the HTML language that is rendering this page right now. Instead of curly braces and colons defining relationships and hierarchies, descriptive tags within <angle brackets> accomplish essentially the same task but also provide more descriptive information.
WordPress
I saved WordPress for last because it is the least centralized of the three major platforms and therefore the least consistent. Users can use .wordpress.com third-level-domains to host their content or manually install WordPress directly on a VPS like I did. WordPress is open-sourced software so individual site owners can do whatever they want with it. Theoretically API data should be stored at:
https://[blog].com/wp-json/wp/v2/posts
with total posts information included as a Request-Header. This was unfortunately not always the case, only working less than half of the time. For the remaining majority of WordPress sites, I would have to use brute-force to get post information. This is the last resort because it involves reading through the most recent posts on each blog and literally picking out the last activity date via what is seen on screen. This process unique to each site since different sites have different ways of displaying the post dates.
https://[blog].com/[latest-year]
 The proper API page on Arcanum's Archives.

Python Script
Preliminary Steps
Now that we know where the information about each fansite is kept, we can programmatically download it. Just like the previous scripts I have written for this project I will be using Python. It is a straight-forward language with lots of modular packages already written for it. Several modules come installed by default with Python, but a few more need to be installed.
pip3 install requests, bs4, mysql-connector-python
If one does not already exist, create a new MySQL user to access the database. It is important to create new users for each application because each user should have the tightest permissions possible while still being able to function. I’ve mentioned this before: getting hacked is a very real possibility. A compromised user should have limited ability to ruin your database. In this case the new user can only update, select, and output records to files.
sudo mysql
CREATE USER '[user-name]'@'localhost' IDENTIFIED BY '[password]';
GRANT UPDATE, SELECT, FILE ON [database].[table] TO '[user-name]'@'localhost';
Setup
After installing the required modules we can start writing the script. First, each package must be imported in order to be used within the script.
import requests
from bs4 import BeautifulSoup
import json
import datetime
import mysql.connector
import os
The next step is to initialize a database using MySQL Connector. I put the username and password of the MySQL User in mysql_user.csv so I can share this code without compromising any information. I am then querying the database to get information from each site that will be referenced later.
creds = open("/var/www/p101/py-crawler/mysql_user.csv","r").read().strip().split(",")
myuser = mysql.connector.connect(
    host = "localhost",
    user = creds[0],
    password = creds[1],
    database = creds[2]
    )
mycursor = myuser.cursor()
mycursor.execute("SELECT new_domain, hosting, url, last_active, posts, source FROM sites")
sites = mycursor.fetchall()
The last few setup lines create a dictionary for converting month names to numbers, log files for updates and errors, and a dictionary for connecting Blogger site names to blog IDs.
month_to_MM = {"jan":"01","feb":"02","mar":"03","apr":"04","may":"05","jun":"06","jul":"07","aug":"08","sep":"09","oct":"10","nov":"11","dec":"12"}
cur_year = datetime.datetime.now().year

activity_log = open("/var/www/p101/py-crawler/activity_log.txt","a")
error_log = open("/var/www/p101/py-crawler/error_log.txt","a")

blogger_api_key = creds[3]
mycursor.execute("SELECT * FROM blogger;")
blogger_sites = mycursor.fetchall()
mycursor.close()
blogger_dict = {}
for line in blogger_sites:
    if line[0] != "name":
        blogger_dict[line[4]] = str(line[3])
Scraping Functions
The general process for scraping data starts with using requests.get() to get the page stored at the provided URL and storing it as a JSON. The JSON data structure makes it easier to access certain records, seen below using square-bracket dictionary indexing. The same process is used again for getting the number of posts, but this data is often stored in a slightly different place so another request is made. Finally the data is formatted and then returned from the function.
Blogger
def getBlogger(site_p101_domain):
    blog_api = requests.get("https://www.googleapis.com/blogger/v3/blogs/"+blogger_dict[site_p101_domain]+"
        /?key="+blogger_api_key).json()
    total = blog_api["posts"]["totalItems"]
    post_api = requests.get("https://www.googleapis.com/blogger/v3/blogs/"+blogger_dict[site_p101_domain]+"/posts
        /?key="+blogger_api_key).json()
    latest = post_api["items"][0]["published"]
    latest_formatted = latest[:latest.find("T")]
    return (total,latest_formatted)
Tumblr
def getTumblr(site_url):
    api = requests.get(site_url+"/api/read")
    soup = BeautifulSoup(api.content, "html.parser")
    header = str(soup.find("posts"))[:200]
    total = int(header[header.find("total")+7:header.find(">")-1])
    latest = str(header[header.find("date")+11:header.find(":")-3])
    latest_formatted = "-".join([latest[7:],month_to_MM[latest[3:6].lower()],latest[0:2]])
    return (total,latest_formatted)
WordPress
def getWordpress(site_url):
    api = requests.get(site_url+"/wp-json/wp/v2/posts")

    #if latest post uses proper api
    if api.status_code == 200:
        latest = api.json()[0]["date"]
        latest_formatted = latest[:latest.find("T")]
        num_posts = api.headers["X-WP-Total"]
        num_pages = api.headers["X-WP-TotalPages"]
        total = int(num_posts) + int(num_pages)
        return (total,latest_formatted)

    #search for the most recent post by year
    else:
The first part of the getWordpress() function assumes that the site in question use the API properly. As I mentioned before, exceedingly few sites follow this convention. I am not going to include the rest of the function here because it is very lengthy and devolves into a case-by-case basis. There is another function for sites that do not use WordPress at all and it is explicitly case-by-case. I will link to the whole script at the end of this post.
Updating Database
Now that everything is setup for scraping the number of posts and date of last activity for each site, the process needs to be looped through each site that is being proxied. The sites array that was created at the beginning of the script containing each site’s data is broken into more descriptive variables that contain the information of each field. A boolean variable is created for each log file so that a header with the date is not added to the file for each change that is made.
#to make sure activity/error headers only written if there is a change
activity_written = False
error_written = False

for line in sites:
    p101_domain = line[0]
    hosting = line[1]
    url = line[2]
    lactive = line[3]
    num_posts = line[4]
    source = line[5]
A giant if-else chain is used to sort out whether each site is proxied or not, and which platform it uses. The try clause is to gracefully handle errors and output them to the error_log.txt file.
if hosting == "proxy":
    try:
        if source=="Tumblr":
            stats = getTumblr(url)
        elif source=="Blogger":
When the newly scraped date of last activity is more recent than the date of last activity on record the database should be updated. For the sites that do not conveniently provide total post data, it simply increments the post number I had manually inserted to the database. Then an update statement is executed. Updates must be committed before they take effect. The final if clause checks to see if a header in the activity file has already been written for this session.
elif str(stats[1]) > str(lactive):
    if stats[0] == "undef":
        newval = int(num_posts) + 1
    else:
        newval = stats[0]

    mycursor = myuser.cursor()
    mycursor.execute("UPDATE sites SET last_active='"+str(stats[1])+"', posts="+str(newval)+" WHERE
        new_domain='"+p101_domain+"';")
    myuser.commit()
    mycursor.close()
    if activity_written == False:
        activity_log.write("Scrape: "+str(datetime.datetime.now())+"\n")
        activity_written = True
    activity_log.write("\t"+p101_domain+" updated to: "+str(newval)+"\n")
Updating floater_info.csv
All of the new data should now be included in the database. The only issue that remains is that the floating site information box on each site still uses the old data. This is because Javascript code cannot query the database directly, but must rely on data placed in a file on the server. To update this we can execute operating system commands in the same script. The first step is to export data from the database into a file:
mycursor = myuser.cursor()
mycursor.execute("SELECT new_domain, hosting, url, wayback_link, still_up, last_active, posts, problems, source FROM sites WHERE new_domain!='' INTO OUTFILE '/var/lib/mysql-files/floater_info.csv' FIELDS TERMINATED BY '\\t' LINES TERMINATED BY '\\n';")
mycursor.close()
myuser.close()
MySQL data can only be exported into files in the /var/lib/mysql-files directory so this file must then be moved to a directory mapped on the server.
os.system("mv /var/lib/mysql-files/floater_info.csv /var/www/p101/global-scripts")
Because the file was created in MySQL and not by us directly in the terminal, it has limited permissions. We can change these permissions so the file can be read by anyone with the chmod Linux command. I’m not going to go into detail about the specifics, but the number specifies which permissions are added.
os.system("chmod 644 /var/www/p101/global-scripts/floater_info.csv")
This is the end of the script, which can be downloaded in its entirety here.
Adding to Crontab
Now that the script is setup, I want it to automatically be run every day. Linux has a useful function called crontab that allows scripts to be executed at regular intervals, which is exactly what I need.
sudo crontab -e
Upon running the above command for the first time it will prompt you with a choice of text editor to use to edit the crontab file. I opted to use vim because I am accustomed to it but nano is the more intuitive option. After opening the file I added a line to execute the activity_checker_mysql.py file every day at 2 am EST. I chose this time because hopefully no posts would have been made this late and possibly confuse the script if it happens to be running at the same time.
00 02 * * * python3 /var/www/p101/nic/scripts/activity_checker_mysql.py
Because crontab is executed as the root user, there is no need to add a sudo before the command. If the script were run under a non-root user the os commands executed in Python would have asked for a sudo password, which I don’t exactly want to provide every day at 2 am or hardcode on the system.
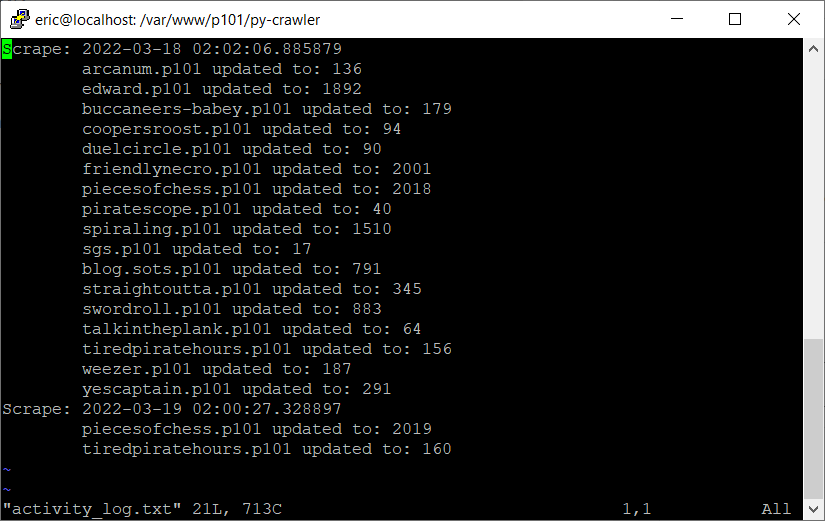
activity_log.txt after the initial, manual scrape and the first crontab scrape.I was super nervous that this system would not work correctly when it was run off crontab. I had done extensive testing on the script up to this point and made sure that it all worked, even going so far as creating a test database with all the same values so that I didn’t accidentally screw up my live database. It all paid off when I checked the activity_log.txt file and saw that two new entries had been added. The table hosted on the Sites page of the NIC updated as well. This system still has a few quirks, namely that the cache must be cleared on each proxied page in order for the floater box to be updated with the new information.