In the previous two posts we have found all of the Pirate101 fan sites and downloaded them for archiving. Now we can make them available on the web under a new domain. I am using the .p101 Handshake domain but this can be adapted to any traditional ICANN domain as well. The following steps will assume you have a basic Apache web server running on an Ubuntu VPS, which I set up following this tutorial.
Initial Setup
First we need to move to the Apache config directory. This location can vary depending on your version and setup, but in my case I used the following command:
eric@localhost:~$ cd /etc/apache2/sites-available
Now we need to create a new site using Apache’s Virtual Host functionality. To do that we need to create a new configuration file via a command-line editor. I will be using vim but other options include nano and emacs. Because this file is being created in a system directory we need to use the sudo command to invoke admin privileges. The filename should reflect which site it will be hosting, and each site gets its own configuration file.
eric@localhost:/etc/apache2/sites-available$ sudo vi duelist.p101.conf
Mirroring a Dead Site
Now in the command-line text editor you should see an empty file. Fill in the following directives in the file to successfully host a site, changing the fields as necessary depending on your situation.
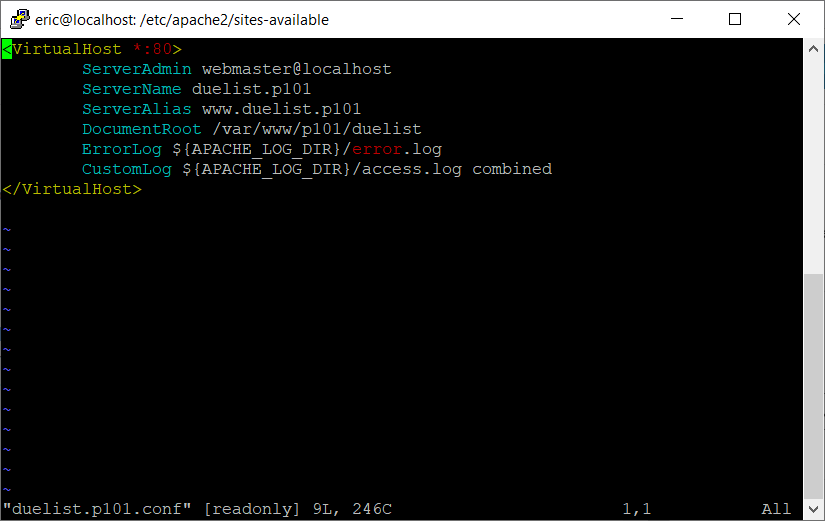
In the config file above the *:80 specifies the port to serve traffic on. Port 80 is the default used by Apache for HTTP traffic but others can be used (port 443 is the default for HTTPS). The ServerName and alias specify that these settings apply when a client connects to “duelist.p101”. The DocumentRoot line states where the files to be hosted are on the server. The last two lines point to where logs are saved when there is an error or when someone connects to the site.
Once the config file is filled out we need to enable the site and then update the Apache server so that it is recognized. The following two steps to do this are:
sudo a2ensite duelist.p101.conf
sudo systemctl reload apache2
If you have not already created the directory where the content will be hosted, do that now and copy the website files over. With this complete you can now move on to the Setting DNS Records section at the bottom of this post.
Proxying a Live Site
Even though we downloaded the files of a live website in the previous tutorial, we do not want to use these files to show to an end-user. If the website creator updates the site at all this would not be reflected in the content we downloaded. To show an up-to-date version of the live site we actually don’t need to do any downloading at all. It is as simple as specifying a few things in the config file in Apache.
First off, if they aren’t enabled already, enable Apache’s mod_proxy and mod_proxy_html packages.
sudo a2enmod proxy
sudo a2enmod proxy_html
Then enter the following configurations:
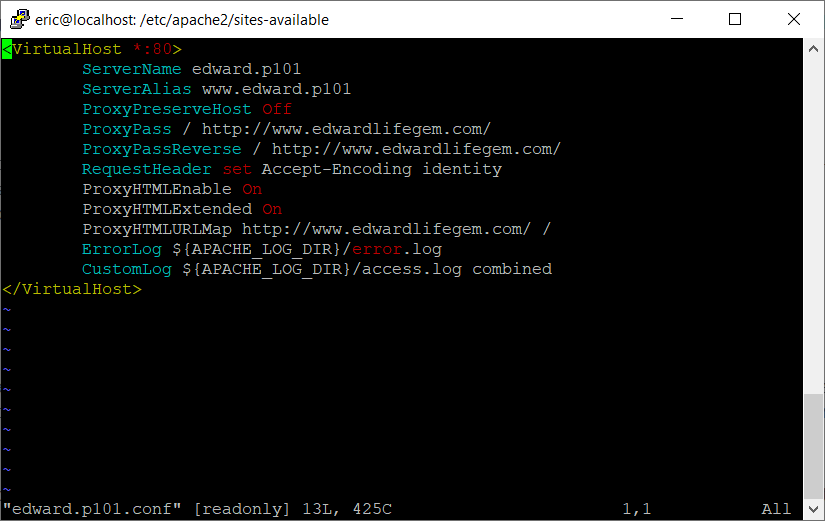
The config file above is slightly different than the one used to re-host dead sites. First, ProxyPreserveHost Off prevents the proxied website’s hosting provider from taking a user’s request, which leads to broken links. The next two lines state the website that is to be proxied and its destination location on this domain. The single / signifies that this will happen at the root directory right after the “.p101” of the URL. The RequestHeader line makes sure that the file encoding remains the same and prevents entire sites of blank pages. ProxyHTML rewrites internal links on a page so that they take on the proxy domain.
Just as before the new site config must be enabled and the system settings reloaded.
sudo a2ensite edward.p101.conf
sudo systemctl reload apache2
Setting DNS Records
Everything should be setup on your server by this point, but when you attempt to visit the domain you just created your web browser returns a 404. Now for the final step you have to set some DNS records in your domain manager. I am currently using Namebase’s name server but the same general rules will apply regardless of who your domain registrar is.
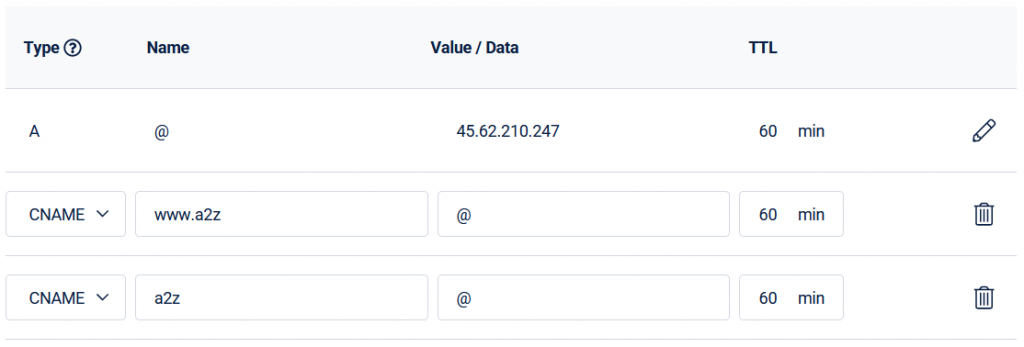
An A record is the address of the domain, where @ stands for the root. The IP address in the second box should be the IP for your server. If you don’t know what it is, use the command ifconfig in your server. The IP address after the first inet entry should be the publicly accessible address of the server. The subdomain you are hosting a site on will be in the box labled “Name” and its corresponding address in the second box. Assuming you are hosting the subdomains on the same server, you can use the CNAME record to avoid writing out the IP for each site.
Now try visiting the same webpage. It should work this time.
I hope this tutorial was helpful in some way. I spent many hours scouring StackOverflow, Youtube, and the Apache manual to try to accomplish the few steps listed above; it took a lot of frustration and trial/error but it eventually worked out how I wanted it to. I am far from finished with this project but the steps outlined in the Archival Process series detail the most important things you can do for other vulnerable communities you may be involved with.